Bmp180 description in Russian. Atmospheric pressure sensor BMP085 and Arduino. Code and connection
BMP085 is a barometric pressure sensor (it also controls temperature).
The sensor is used in many projects, including those using Arduino, since it has practically no analogues. In addition, it is also inexpensive. The first question that arises is: why would someone measure atmospheric pressure? There are two reasons for this. The first is to control altitude. As the altitude increases, the pressure drops. Very convenient for hiking, as an alternative to GPS navigators. In addition, the barometric pressure indicator is used for weather forecasting.
The BMP085 was replaced by the BMP180 sensor, which connects to Arduino and other microcontrollers in the same way as its predecessor, but it is smaller and cheaper.
Specifications BMP085
- Sensitivity range: 300-1100 hPa (9000 m - 500 m above sea level);
- Resolution: 0.03 hPa / 0.25 m;
- Operating temperature -40 to +85°C, temperature measurement accuracy +-2°C;
- i2c connection;
- V1 on the module uses 3.3V power and logic power;
- V2 on the module uses 3.3-5V power and logic power;
After restarting the Arduino IDE, you can run the first sketch, the code of which is given below:
#include <Wire.h>
#include <Adafruit_Sensor.h>
#include <Adafruit_BMP085_U.h>
Adafruit_BMP085_Unified bmp = Adafruit_BMP085_Unified(10085);
void setup(void)
Serial.begin(9600);
Serial.println("Pressure Sensor Test"); Serial.println("");
/* Initialize the sensor */
if(!bmp.begin())
/* If the inscription appeared: "There was a problem detecting the BMP085 ...",
Check sensor connection */
Serial.print("Ooops, no BMP085 detected ... Check your wiring or I2C ADDR!");
sensors_event_t event;
bmp.getEvent(&event);
/* display results (barometric pressure is measured in hPa) */
if (event pressure)
/* Display atmospheric pressure in hPa */
Serial.print("Pressure: "); Serial.print(event.pressure); Serial.println("hPa");
Open the serial monitor window (baud rate - 9600). Our sketch should output pressure data in hPa (hectopascals). You can check if the sensor is working by pressing your finger on the sensor. The figure shows the pressure values after pressing with a finger.

Altitude measurement
You probably know that pressure drops with altitude. That is, we can calculate the height, knowing the pressure and temperature. Again, we leave the math behind the scenes. If you are interested in the calculations, you can read them on this Wikipedia page.
The example below will use the Arduino add-on library. To calculate the height using the BMP085 sensor, update the "void loop()" function. The required changes to the sketch are shown in the sketch below. As a result, you will get the temperature value based on the pressure level and the temperature value.
/* create a new event (event) for the sensor */
sensors_event_t event;
bmp.getEvent(&event);
/* display results (barometric pressure in hPa) */
if (event pressure)
/* Display atmospheric pressure in hPa */
Serial.print("Pressure: ");
Serial.print(event.pressure);
Serial.println("hPa");
/* to calculate the height with a certain accuracy, you need to know *
* average pressure and temperature environment
* in degrees Celsius at the time of reading*
* if you do not have these data, you can use the "default value",
* which is equal to 1013.25 hPa (this value is defined as
* SENSORS_PRESSURE_SEALEVELHPA *
* in the sensors.h file). But the results will not be accurate *
*Required values can be found on websites with temperature forecasts*
* or on the resources of information centers at large airports *
* for example, for Paris, France, you can find the current average pressure value *
* by website: http://bit.ly/16Au8ol */
/* get the current temperature value from the BMP085 sensor */
floating temperature;
bmp.getTemperature(&temperature);
Serial.print("Temperature: ");
Serial print(temperature);
Serial.println("C");
/* convert received data to height */
/* update next line with current values */
float seaLevelPressure = SENSORS_PRESSURE_SEALEVELHPA;
Serial.print("Altitude: ");
Serial.print(bmp.pressureToAltitude(seaLevelPressure,
Serial.println("m");
Serial.println("");
Serial.println("Sensor error");
We run the sketch and see the calculated height above sea level.

The accuracy of the BMP085 readings can be greatly improved by specifying the average pressure value, which varies with the weather. Every 1 hPa of pressure we didn't take into account results in an error of 8.5 meters!
The figure below shows the pressure values from one of the information resources of a European airport. The pressure value is highlighted in yellow, which we can use to refine the results.

Let's change the following line in our sketch by writing the actual value (1009 hPa) in it:
float seaLevelPressure = 1009;
As a result, we get slightly different results:

Tip: When you specify the pressure, be sure to convert the data used to hPa.
Using BMP085 (API v1)
We repeat once again: in order to find out the pressure and height above sea level, we need to do some calculations. But all of them are already included in the Adafruit_BMP085 Arduino Library (API v1), which can be downloaded from the link.
After installing the libraries, you need to restart the Arduino IDE
After reboot, you can run the first sketch example:
#include <Wire.h>
Adafruit_BMP085 bmp;
Serial.begin(9600);
Serial.println("*C");
Serial.print("Pressure = ");
Serial.println("Pa");
Serial.println();
After flashing your Arduino, open the serial monitor. Set the baud rate to 9600. The sketch will output temperature in degrees Celsius and pressure in pascals. If you put your finger on the sensing element of the sensor, the temperature and pressure will increase:

Altitude measurement (API v1)
To control the height above sea level, just run the sketch below:
#include <Wire.h>
#include <Adafruit_BMP085.h>
Adafruit_BMP085 bmp;
Serial.begin(9600);
Serial.print("Temperature = ");
Serial.print(bmp.readTemperature());
Serial.println("*C");
Serial.print("Pressure = ");
Serial.print(bmp.readPressure());
Serial.println("Pa");
// calculate the height above sea level, starting from the values
// "standard" barometric pressure equal to 1013.25 mibar = 101325 Pascal
Serial.print("Altitude = ");
Serial.print(bmp.readAltitude());
Serial.println("meters");
Serial.println();
Run the sketch to display the results:

Judging by the readings above, we are at an altitude of -21.5 meters above sea level. But we know that we are above the sea! We recall the same problem as when using API V2. We must take into account the weather! OK. Suppose we find a quality weather website and the pressure is 101.964 Pa. Open the Examples->BMP085test example in the Arduino IDE and edit the line that is highlighted in the figure below:

Enter the current pressure data in this line. After a new start, you will find that the data has changed dramatically and we got 29.58 meters with a plus sign, which is much more like the truth.

Leave your comments, questions and share personal experience below. In the discussion, new ideas and projects are often born!
Absolute pressure and temperature sensor (you won’t surprise anyone with the last today) Bosch BMP180. The sensor is not new and well known, the datasheet has been studied up and down, and there are a whole bunch of libraries.
Characteristics:
- Pressure measuring range: 300 – 1100 hPa.
- Supply voltage: from 1.8 - 3.3 and 5V (if there is a voltage regulator on the board).
- Low power consumption: 3uA (ultra-low power mode)
- Accuracy: low power mode, resolution 0.06hPa (0.5m).
- High line mode with 0.02hPa (0.17m) resolution.
- Connection: interface I2C.
- Ability to measure temperatures in the range -40 … +85 ° C.
- Response time: 5ms - 7.5ms (standard mode).
- Standby current: 0.1uA
The principle of operation of the BMP180 sensor:
The sensor has a sealed chamber, one of the walls of which is a flexible membrane with strain gauges installed on it. The membrane sags in proportion to the pressure difference inside the chamber and outside, which affects the change in the resistance of strain gauges electric current. There is also a temperature sensor, the resistance of which changes in proportion to temperature. ADC (analogue-to-digital converter) translates the results of sensor changes into digital data " uncompensated results” that are available for reading from the sensor registers: “Out MSB”, “Out LSB” and “Out xLSB”. To compensate for the specified results (offset compensation, temperature dependence, manufacturing errors, material inhomogeneities, etc.), each sensor is calibrated at the factory, and individual for each sensor are written to the EEPROM 11 calibration factors
(176 bits) that are available for reading from the encoder registers: "AC1", "AC2", "AC3", "AC4", "AC5", "AC6", "B1", "B2", "MB", " MC, MD.
Keep the sensor away from moisture and direct sunlight.
Data acquisition algorithm:
- Reading calibration coefficients:
Reading values from the registers of the same name:
short AC1, AC2, AC3, B1, B2, MB, MC, MD;
unsigned short AC4, AC5, AC6;
- Temperature reading: (uncompensated value)
We write the value to the “Measurement Control” register: 0x2E;
We read the result from the registers "Out MSB" and "Out LSB";
- Pressure reading: (uncompensated value)
We write the value to the “Measurement Control” register: 0x34 + (OSS<<6);
Expect the "CSO" status flag to fall to "0";
We read the result from the registers "Out MSB", "Out LSB" and "Out xLSB";
long UP = ("Out MSB"<<16 + «Out LSB»<<8 + «Out xLSB») >> (8-OSS);
- Calculation of real values
Code and connection.
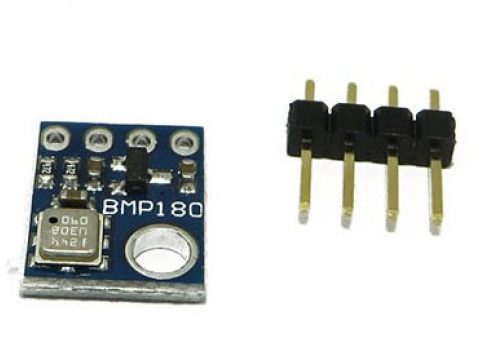
The sensor is quite popular. Most often, it comes already with a strapping in the form of a finished module. You can easily find many different, ready-made libraries. I stopped at BMP180_Breakout_Arduino_Library. You can download from GitHub or from our site.
The connection is described in the library, but I will duplicate it just in case:
SCL(clock)
- Uno, Nano, Pro to A5
- Mega,Due to 21
- Leonardo k 3
SDA(Data)
- Uno, Nano, Pro to A4
- Mega,Due to 20
- Leonardo k 2
VIN- to +5 volts.
IO- This output is on some boards, power supply bypasses the stabilizer. NOT more than 3.3 volts.
GND- connect to minus.
Well, here's an example code with explanations:
#include
A barometer is a device that measures atmospheric pressure. That is, air pressure that presses on us from all sides. Since school, we know that the first barometer was a plate with mercury, and an inverted test tube in it. The author of this device was Evangelista Torricelli, an Italian physicist and mathematician. Reading a mercury barometer can be as simple as reading an alcohol thermometer: the greater the pressure outside the flask, the higher the mercury column inside it. Mercury vapor is known to be highly toxic.
Later, a safer device appeared - an aneroid barometer. In this barometer, mercury was replaced by a corrugated box made of thin tin, in which a vacuum was created. Under the influence of the atmosphere, the box is compressed and through the system of levers turns the arrow on the dial. This is what these two barometers look like. On the left is an aneroid, on the right is a Torricelli barometer.
Why would we need a barometer? Most often, this device is used on aircraft to determine the flight altitude. The higher the apparatus rises above sea level, the less pressure the onboard barometer experiences. Knowing this dependence, it is easy to determine the height.

Another common use case is a makeshift weather station. In this case, we can use the known dependences of future weather on atmospheric pressure. In addition to the barometer, such stations are equipped with humidity and temperature sensors.
Electronic barometer
We will not be able to use such bulky barometers in robotics. We need a miniature and energy efficient device that can be easily connected to the same Arduino Uno. Most modern barometers are made using MEMS technology, as are gyrotachometers with accelerometers. MEMS barometers are based on the piezoresistive or strain gauge method, which uses the effect of changing the resistance of a material under the action of deforming forces.
If you open the case of the MEMS barometer, you can see the sensitive element (on the right), which is located directly under the hole in the protective case of the device, and the control board (on the left), which performs the primary filtering and measurement conversion.

BMP085 and BMP180 sensors
The most affordable pressure sensors, which are often used in flight controllers and various homemade electronic devices, include BOSH sensors: BMP085 and BMP180. The second barometer is newer, but fully compatible with the old version.

Some important characteristics of BMP180:
- range of measured values: from 300 hPa to 1100 hPa (from -500 m to +9000 m above sea level);
- supply voltage: from 3.3 to 5 Volts;
current strength: 5 μA at a polling rate of 1 Hertz; - noise level: 0.06hPa (0.5m) in ultra low power mode and 0.02hPa (0.17m) in advanced resolution mode.
Now let's connect this sensor to the controller and try to estimate the atmospheric pressure.
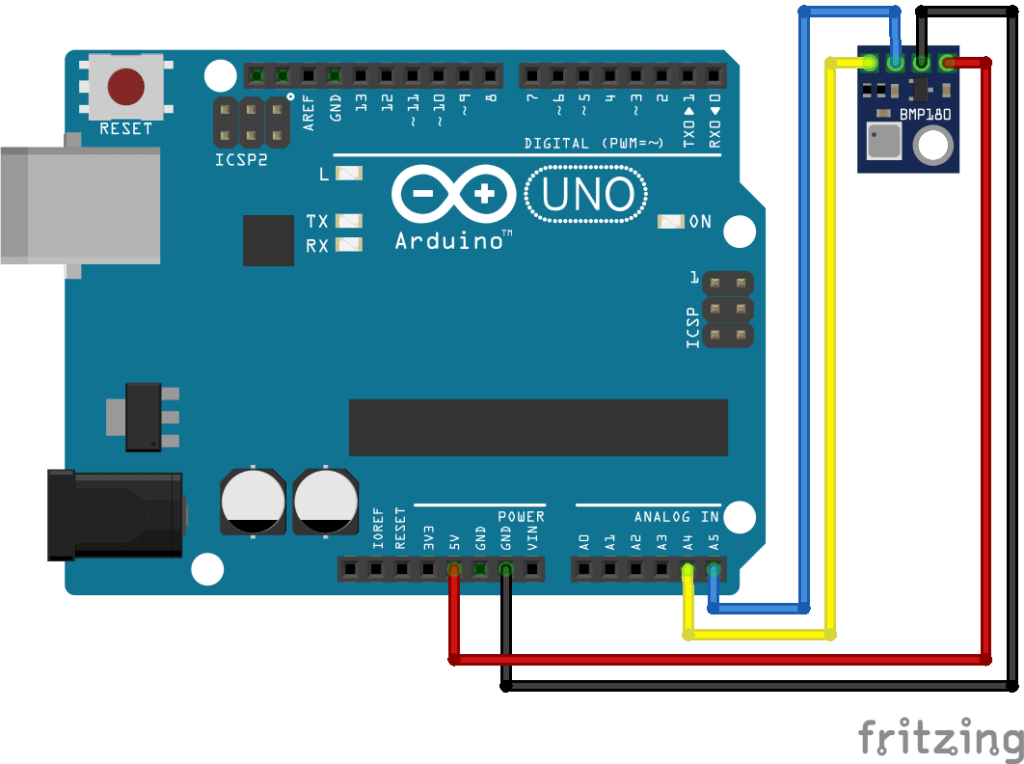
BMP180 connection
Both sensors have an I2C interface, so they can be easily connected to any platform from the Arduino family. This is how the Arduino Uno connection table looks like.
| BMP 180 | GND | VCC | SDA | SCL |
| Arduino Uno | GND | +5V | A4 | A5 |
circuit diagram

Layout appearance
Program
To work with the sensor, we need a library: BMP180_Breakout_Arduino_Library
Download it from the repository and install it in the Arduino IDE. Now everything is ready to write the first program. Let's try to get raw data from the sensor and output it to the COM port monitor.
#include
The procedure for obtaining the desired pressure from the sensor is not so trivial, and consists of several stages. In a simplified form, the algorithm looks like this:
- we ask the barometer for the readings of the built-in temperature sensor;
- wait time A while the sensor evaluates the temperature;
- get the temperature
- ask the barometer for pressure;
- wait time B while the sensor evaluates the pressure;
- get the pressure value;
- return the pressure value from the function.
Time B depends on the measurement accuracy, which is set in the function startPressure. The only argument of this function can take values from 0 to 3, where 0 is the roughest and fastest estimate, 3 is the most accurate pressure estimate.
We load the program on Arduino Uno, and observe the flow of atmospheric pressure measurements. Let's try to raise the sensor above your head, and lower it to the floor level. The readings will change slightly. It remains only to figure out how we can convert these obscure numbers into height above sea level.
Converting pressure to height above sea level
The BMP180 sends back pressure in hectopascals (hPa). These are the units in which atmospheric pressure is measured. 1 hPa = 100 Pascals. It is known that at sea level the average pressure is 1013 hPa, and each additional meter above sea level will reduce this pressure by only 0.11 hPa (approximately).
Thus, if we subtract from the result of the function getPressure number 1013, and divide the remaining difference by 0.11, then we get the value of the height above sea level in meters. This is how our program will change:
Void loop()( double P, Alt; P = getPressure(); Alt = (P - 1013)/0.11; Serial.println(Alt, 2); delay(100); )
In fact, the pressure depends on the height above sea level non-linearly, and our formula is only suitable for the heights at which you and I usually live. Fortunately, mankind knows a more accurate dependence of pressure on altitude, which we can apply to obtain more accurate results.

Here p is the pressure measured at a given point, p0 is the pressure relative to which the height is measured.
The SFE_BMP180 library already has a function that uses the specified one. formula to get the exact height. We use it in our program.
#include
I did not completely copy the getPressure function in order to preserve the readability of the text.
Another variable P0 has appeared in the program - this is the pressure that we will measure at the start of the program. In the case of an aircraft, P0 will be the pressure at the takeoff area from which we will start climbing.
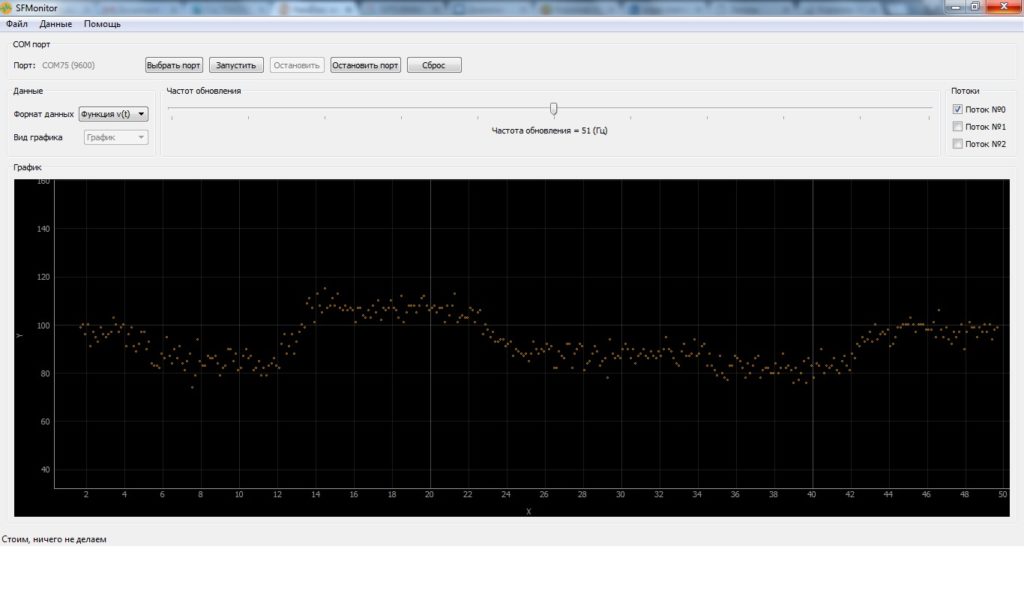
Visualization
Now let's try to display the pressure readings in the program SFMonitor, and see how the pressure changes when the sensor moves to a height of 2 meters.
static const byte PACKET_SIZE = 1; static const byte VALUE_SIZE = 2; static const boolean SEPARATE_VALUES = true; #include
As a result of the program, we get a pressure graph in Pascals:
Conclusion
As we learned from the lesson, determining the height above sea level is not such a trivial task. Not only does pressure depend on height non-linearly, but various external factors also spoil the picture. For example, the pressure in our home is constantly changing over time. Even in a few minutes, the height measured by our device can vary in the range of 0.5 - 1 meter. Temperature also greatly affects the quality of measurements, so we have to take it into account when calculating pressure.
For aircraft it is recommended to use high accuracy sensors such as MS5611. This barometer can measure up to 0.012 hPa, which is 5 times better than BMP180. Also, GPS coordinates are used to clarify the barometric flight altitude.
Good luck with the atmosphere! 🙂
April 2, 2015
The Bosch BMP180 barometric pressure sensor is more energy efficient and more accurate than its predecessor.

BMP180 sensor
The main characteristics of the BMP180 sensor:
- Pressure measuring range: 300 – 1100hPa
- Supply voltage: from 3.3 and 5V
- Low power consumption: 3uA (ultra-low power mode)
- Accuracy: Low Power Mode, Resolution 0.06hPa (0.5m)
- High line mode with 0.02hPa resolution
- Connection: I2C communication protocol
- Ability to measure temperatures in the range -40 … +85 ° C
- Response time: 5ms
- Standby current: 0.1uA

- VCC - for connecting 5v power
- GND - to connect to minus (GND)
- SCL and SDA - for connection to the I2C bus
- 3.3 - for connecting 3.3v power
Buy BMP180 sensor:
Libraries for BMP180 sensor:
To work with the BMP180 sensor, libraries are used that are designed for the BMP085 sensor.
Library for working with the BMP085 atmospheric pressure sensor from Adafruit
Library for working with pressure sensor BMP085
It is up to you to decide which library to use to work with the sensor. I did an overview of the BMP085 library earlier in the article
For example, I will use the library from Adafruit. First, let's run the test sketch from the library and open the port monitor...

As we can see we have:
- Temperature = 27.40 *C - Temperature in degrees Celsius
- Pressure = 97726 Pa - Atmospheric pressure in Pascals
- Altitude = 303.19 meters — Altitude in meters
- Pressure at sealevel (calculated) = 97735 Pa
- Real altitude = 317.47 meters
Setting up and calibrating the BMP180 sensor
I want to draw your attention to the fact that the calculated data are not accurate, and they are given in the sketch.

Information
We can get a more accurate height measurement. If we know the current sea level pressure for our coordinates, which will change depending on weather conditions and the like. If it is 1015 millibars, then the value is 101,500 Pa.
Now we will find out our real height above sea level using maps from Google, for this we will follow the link. In the window with a map from Google, we find our location and click the left mouse button to place a mark on the map.

My location coordinates with height values
As you can see, the height above sea level is 203 m, but I am on the 3rd floor, so add another 7 m and get a height of 210 meters (approximately) and remember it. Now let's move on to the sketch and translate the value with the display of atmospheric pressure data in Pa into mmHg (the value is divided by 133.3) and change the display of “Pa” to “mm”.
code
Arduino
Serial.print("Pressure = "); Serial.print(bmp.readPressure()/133.3); Serial.println("mm");
Serial. print("Pressure = ") ; Serial. print (bmp . readPressure () / 133.3 ) ; Serial. println("mm"); |
and still here
code
Arduino
Serial.print("Pressure at sealevel (calculated) = "); Serial.print(bmp.readSealevelPressure()/133.3); Serial.println("mm");
Serial. print ( "Pressure at sealevel (calculated) = ") ; Serial. print (bmp . readSealevelPressure () / 133.3 ) ; Serial. println("mm"); |
We upload our sketch to the board again and see what we have in the port monitor

Atmospheric pressure sensors bmp180, bmp280, bme280 are frequent guests in engineering projects. With their help, you can predict the weather or measure the height above sea level. Today, this particular line can be called the most popular and inexpensive sensors for arduino. In this article, we will explain the principle of operation of sensors, the connection scheme to various Arduino boards, and give examples of programming sketches.
A barometer is a device that measures atmospheric pressure. Electronic barometers are used in robotics and various electronic devices. The most common and affordable are pressure sensors from BOSH: these are BMP085, BMP180, BMP280 and others. The first two are very similar to each other, BMP280 is a newer and improved sensor.
Pressure sensors work by converting pressure into mechanical movement. The pressure sensor consists of a transducer with a sensitive element, a housing, mechanical elements (membranes, springs) and an electronic circuit.
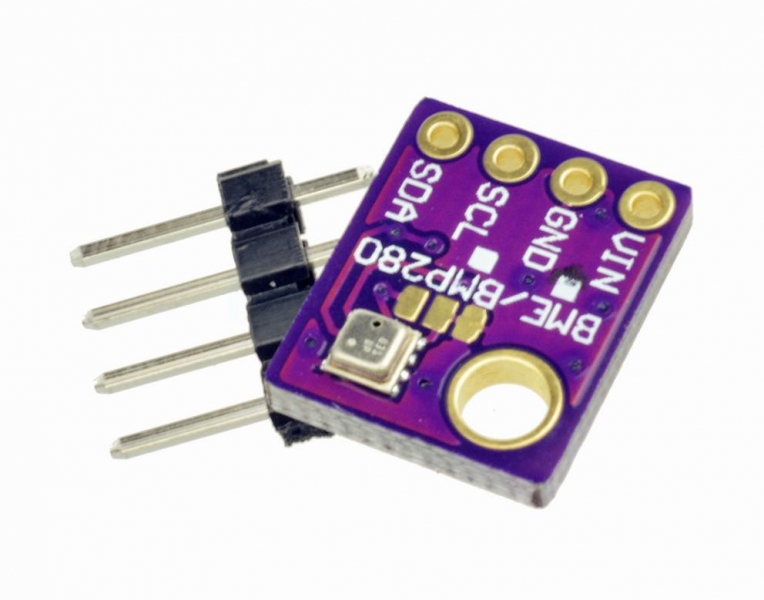
The BMP280 is specifically designed for applications where small footprint and low power consumption are required. Such applications include navigation systems, weather forecasting, vertical speed indication, and others. The sensor has high accuracy, good stability and linearity. BMP280 Sensor Specifications:
- Dimensions 2 x 2.5 x 0.95 mm.
- Pressure 300-1100hPa;
- Temperatures from 0С to 65 С;
- Support for I2C and SPI interfaces;
- Supply voltage 1.7V - 3.6V;
- Average current 2.7uA;
- 3 operating modes - sleep mode, FORCED mode (taking measurements, reading values, switching to sleep mode), NORMAL mode (transferring the sensor to cyclic operation - that is, the device automatically wakes up after a set time, takes measurements, reads readings, saves measured values and goes back to sleep mode).
The BMP180 is a low cost and easy to use touch sensor that measures barometric pressure and temperature. It is usually used to determine the height and in weather stations. The device consists of a piezo-resistive sensor, a thermal sensor, an ADC, non-volatile memory, RAM and a microcontroller.
BMP180 Sensor Specifications:
- Limits of measured pressure 225-825 mm Hg. Art.
- Supply voltage 3.3 - 5V;
- Current 0.5mA;
- Support for I2C interface;
- Response time 4.5ms;
- Dimensions 15 x 14 mm.
The bme280 sensor contains 3 devices - for measuring pressure, humidity and temperature. Designed for low current consumption, high reliability and long-term stable operation.
bme280 sensor specifications:
- Dimensions 2.5 x 2.5 x 0.93 mm;
- Metal LGA package equipped with 8 outputs;
- Supply voltage 1.7 - 3.6V;
- Availability of I2C and SPI interfaces;
- Current consumption in standby mode 0.1 uA.
If we compare all devices with each other, then the sensors are very similar. Compared to its predecessor, which includes the BMP180, the newer BMP280 sensor is noticeably smaller in size. Its eight-pin miniature package requires care during installation. The device also supports I2C and SPI interfaces, unlike its predecessors, which only supported I2C. According to the logic of the sensor, there are practically no changes, only the temperature stability has been improved and the resolution of the ADC has been increased. The BME280 temperature, humidity and pressure sensor is also similar to the BMP280. The difference between them lies in the dimensions of the case, since the BME280 has a humidity sensor, which slightly increases the dimensions. The number of contacts and their location on the case are the same.
Connection options for Arduino
Connecting BMP180 sensor to Arduino. To connect, you will need the BMP180 sensor itself, the Arduino UNO board, connecting wires. The connection diagram is shown in the figure below.
The ground from the Arduino must be connected to the ground on the sensor, the voltage is 3.3 V, SDA - to pin A4, SCL - to A5. Pins A4 and A5 are selected based on their I2C interface support. The sensor itself operates on a voltage of 3.3 V, and Arduino - from 5 V, so a voltage regulator is installed on the module with the sensor.
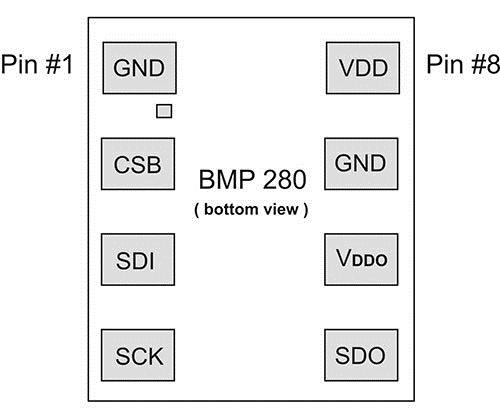
Connecting BMP 280 to Arduino. The pinout and top view of the board are shown in the figure.
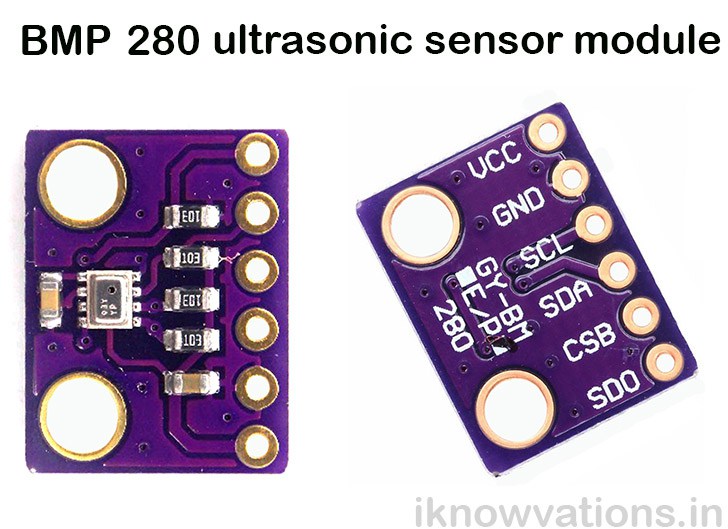
The pressure sensor module itself looks like this:
To connect with Arduino, you need to connect the outputs as follows: connect the ground to Arduino and on the sensor, VCC - to 3.3V, SCL / SCK - to analog pin A5, SDA / SDI - to A4.
Connecting the BME280 sensor. The pin layout and pinout of the BME280 is the same as the BMP280.

Since the sensor can work via I2C and SPI, the connection can be implemented in two ways.
When connecting via I2C, you need to connect the SDA and SCL pins.

When connecting via SPI, you need to connect SCL from the module and SCK (pin 13 on Arduino), SDO from the module to Arduino pin 12, SDA to pin 11, CSB (CS) to any digital pin, in this case to pin 10 on Arduino . In both cases, the voltage is connected to 3.3V on the Arduino.

Description of the library for working with the sensor. Sketch example
To work with the BMP180 sensor, there are various libraries that simplify the work. These include SFE_BMP180, Adafruit_BMP085. The same libraries are suitable for working with the BMP080 sensor. The bmp280 sensor uses a similar Adafruit_BMP280 library.
The first test sketch will have the sensor read pressure and temperature readings. The code is suitable for both the BMP180 sensor and the BMP280, you just need to connect the correct library and specify the correct pins to which the module is connected. First of all, in the code, you need to connect all the libraries and initialize the operation of the sensor. To determine pressure, you must first know the temperature. For this, the following code element is used.
Status = pressure.startTemperature();// Reading temperature data from the sensor if(status!=0)( delay(status); // Waiting status = pressure.getTemperature(T); // Saving received temperature data if( status!=0)( Serial.print("Temperature: "); // Displaying the word "Temperature" Serial.print(T,2); // Printing the temperature value. Serial.println("deg C, "); //Print Celsius symbol.
Then you need to get information about atmospheric pressure.
Status = pressure.startPressure(3); // read pressure if(status!=0)( delay(status); // Wait status = pressure.getPressure(P,T); // get pressure, save if(status!=0)( Serial.print( "Absolute pressure: "); // Printing the words "Atmospheric pressure" Serial.print(P,2); // Printing the value of the mBar variable Serial.print(" mbar, "); // Printing text "mBar" Serial.print(P*0.7500637554192,2); // display the value in mmHg (mmHg) Serial.println(" mmHg");) // print the pressure unit "mmHg" " (mmHg.).
After uploading the sketch, the port monitoring window will display data on temperature and atmospheric pressure.
The BME280 sensor also shows pressure and temperature, in addition it can read humidity readings, which is turned off by default. If necessary, you can adjust the sensor settings and start reading humidity readings. Measuring range from 0 to 100%. The library that is needed to work with the sensor is called Adafruit_BME280.
The code is similar to the one described above, only lines are added to it to determine the humidity.
Void printValues() ( Serial.print("Temperature = "); Serial.print(bme.readTemperature()); Serial.println("C"); //Determine the temperature, display it on the screen in degrees Celsius. Serial. print("Pressure = "); Serial.print(bme.readPressure() / 100.0F); Serial.println(" hPa"); //Determination of pressure, displaying it on the screen Serial.print("Humidity = "); Serial.print(bme.readHumidity()); Serial.println(" %"); //determining humidity as a percentage, displaying the measured value on the screen. Serial.println(); )
Possible connection errors and their elimination
The most common error is incorrect data on pressure and temperature, which differ by several orders of magnitude from the real value. The reason for this most often is an incorrect connection - for example, the library indicates that you need to connect via I2C, and the sensor is connected via SPI.
Also, when using “Chinese” sensors, you may encounter non-standard I2C or SPI addresses. In this case, it is recommended to scan all connected devices using one of the popular sketches and find out which address your pressure sensor responds to.
Another problem may be the discrepancy between the operating voltage of the module supply and the base voltage of the controller used. So, to work with a 3.3 V sensor, you will need to create a voltage divider or use one of the existing ready-made level matching modules. By the way, such modules are quite cheap and it is recommended for beginners to use them.
Small deviations from the actual value may be due to sensor calibration. For example, for the BMP180 sensor, all data is calculated and specified in the sketch. To obtain a more accurate altitude value, you need to know the current value of pressure above sea level for these coordinates.
Conclusion
Atmospheric pressure sensors bmp180, bmp280 are not the cheapest types of sensors, but in many cases there is practically no alternative to such sensors. In the project of a weather station, the sensor captures an important parameter - atmospheric pressure, which makes it possible to predict the weather. In projects related to the creation of flying vehicles, the barometer is used as a sensor of real height above sea level.
Connecting sensors is not difficult, because. Uses a standard i2C or SPI connection. For programming, you can use one of the ready-made .
